
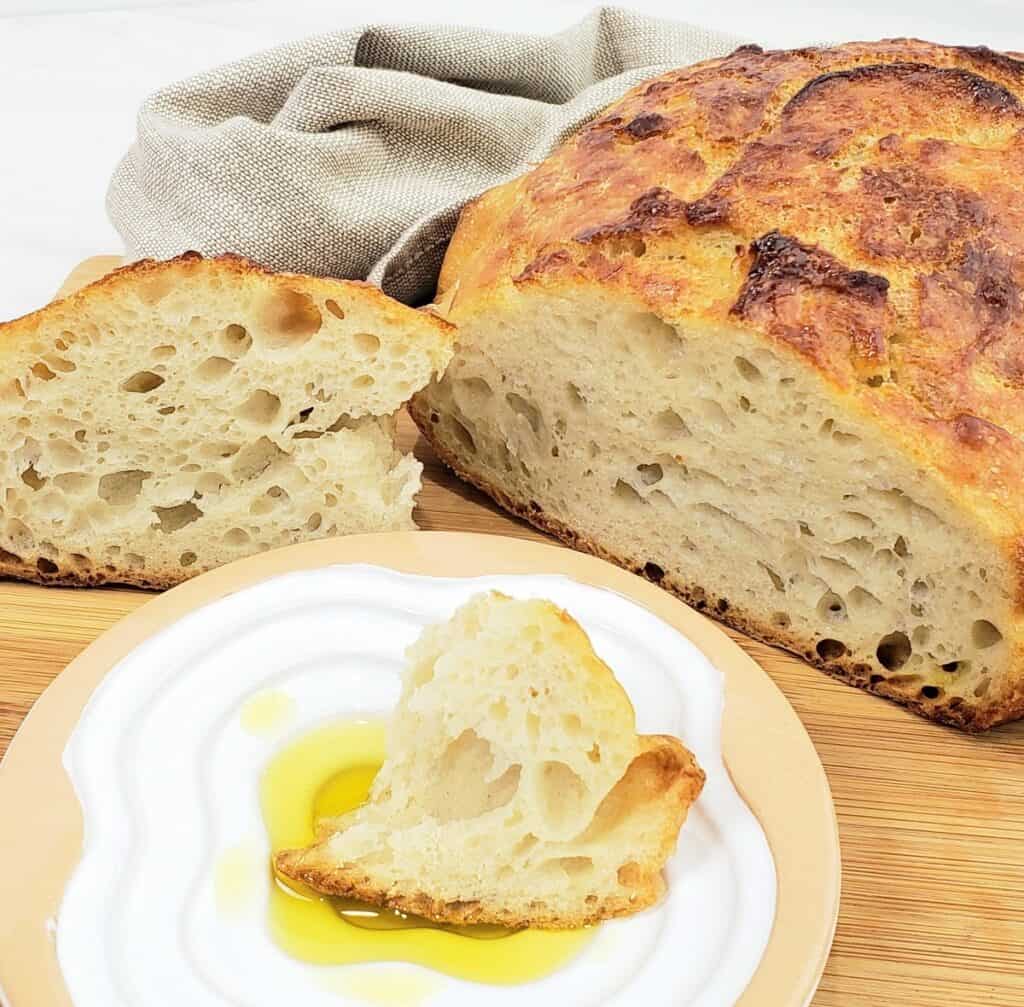
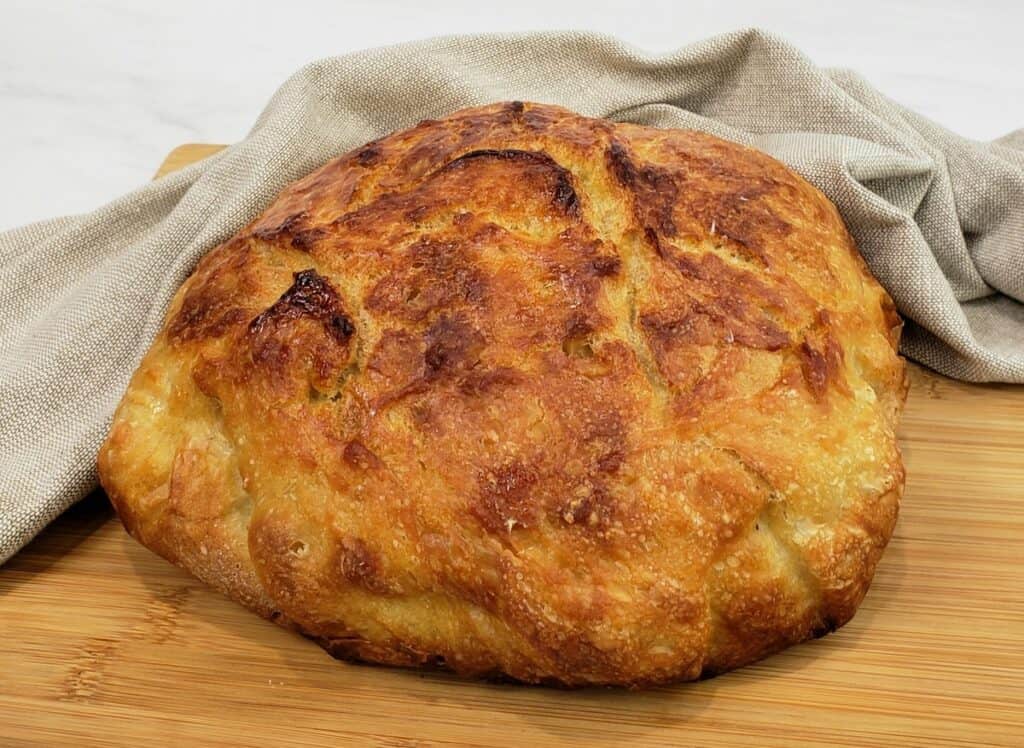
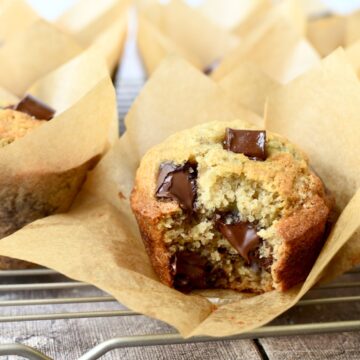
This easy Dutch Oven No Knead Bread recipe takes only 5 minutes prep time and is made with 4 pantry ingredients! This shortcut homemade artisan yeast bread looks like it belongs in a Paris bakery! It's crazy how simple it is to make in your own kitchen.

SAVE THIS RECIPE
Truth be told, I've made this easy, hands-off loaf of bread recipe probably 15 times since staying at home more this year. My family simply can't resist the soft & chewy insides contrasted by the rustic crunchy crust.
This bread with its golden, crusty outside and soft & chewy inside is perfect to serve with soup like Easy Hamburger Vegetable Soup and Shortcut Turnip Green Soup.
I love how I can make it as an overnight no knead bread with no additional prep or continuous care like sourdough bread loaves.
Make it faster by using instant yeast (rapid rise) or letting it rise in a warm place (85 to 90°F) instead of overnight at room temperature.
Shortcuts
- Dough doesn't have to be kneaded...or even touched with your fingers!
- Yeast doesn't have to first be dissolved in water.
- No heavy-duty mixer with dough hooks needed.
- No shaping the dough into a ball
- No second rising time and you don't have to watch it closely to catch it at the perfect "double in size" time frame before baking.
From experienced bread makers to beginners, this simple foolproof recipe will become a family favorite comfort food for everyone.
No matter how you slice it (see what I did there) this is the best no-knead artisan bread I've ever eaten!
Ingredients
- All-purpose flour (Bread flour is not necessary but will also work)
- Active dry yeast or rapid rise yeast
- Salt
- Tap water
How to make no knead Dutch oven bread
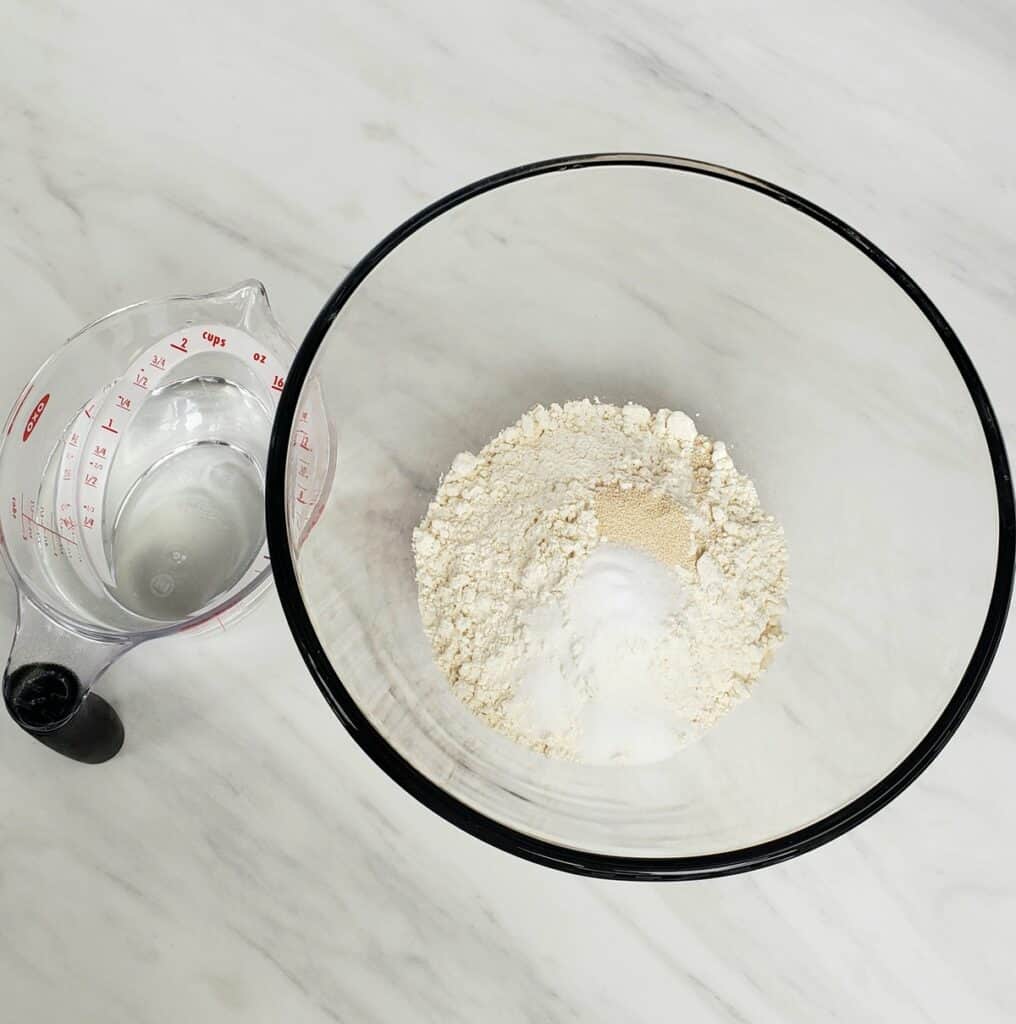
- Combine flour, yeast, and salt in a large bowl
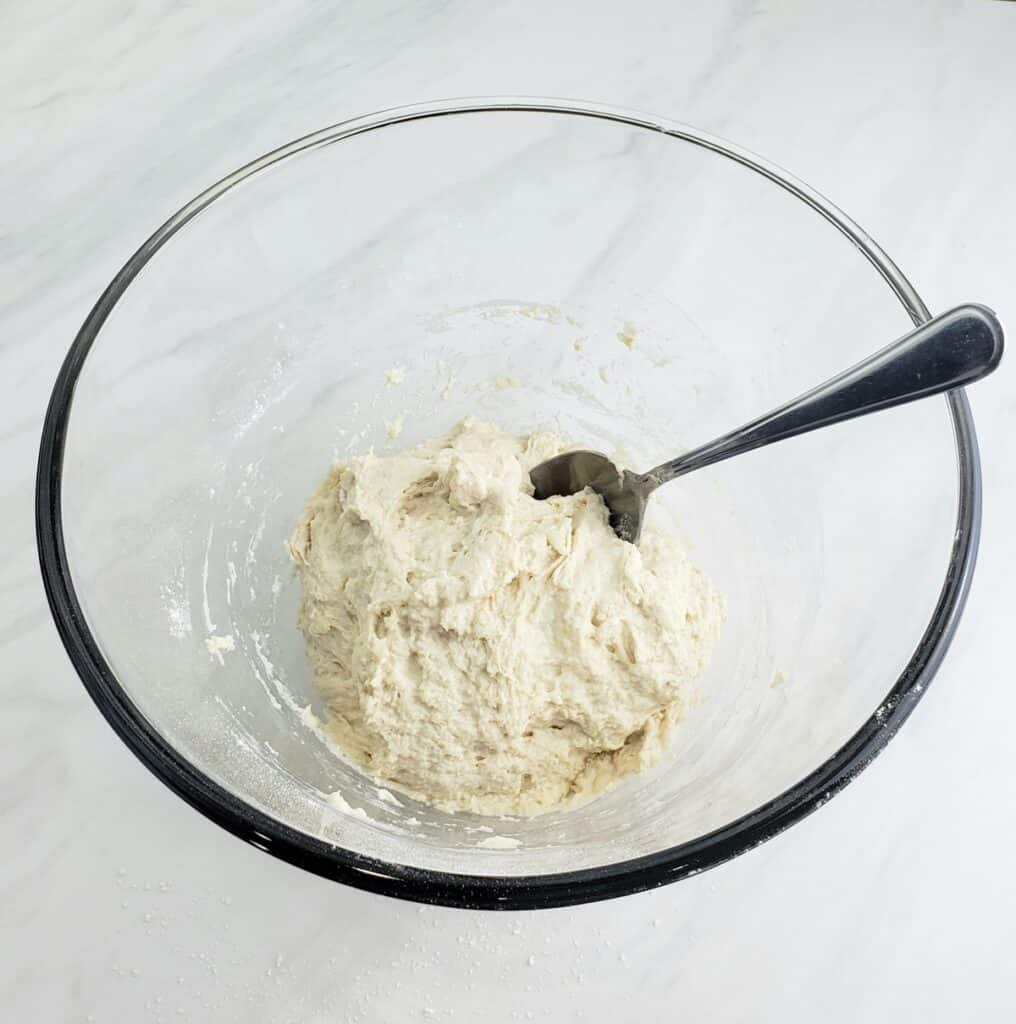
- Add water and stir until all the flour is moistened. It will form a loose ball.
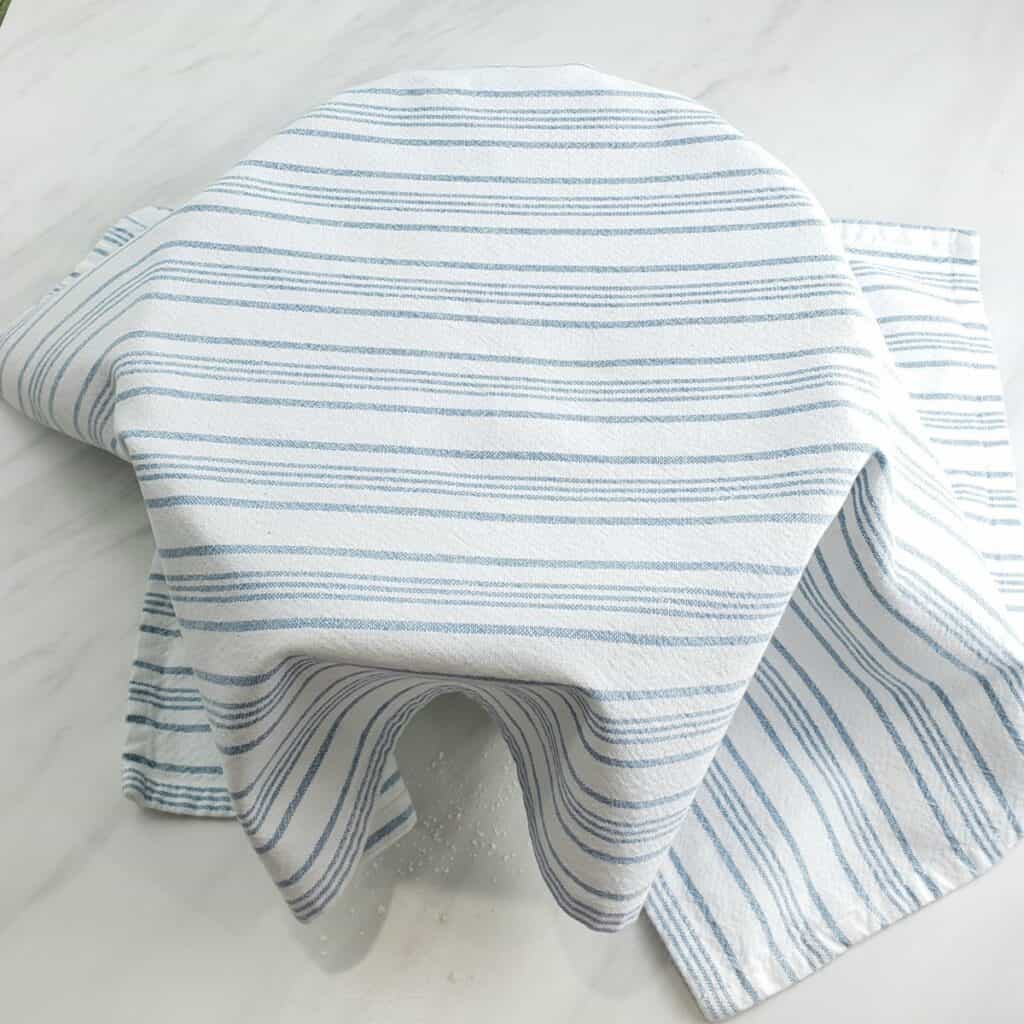
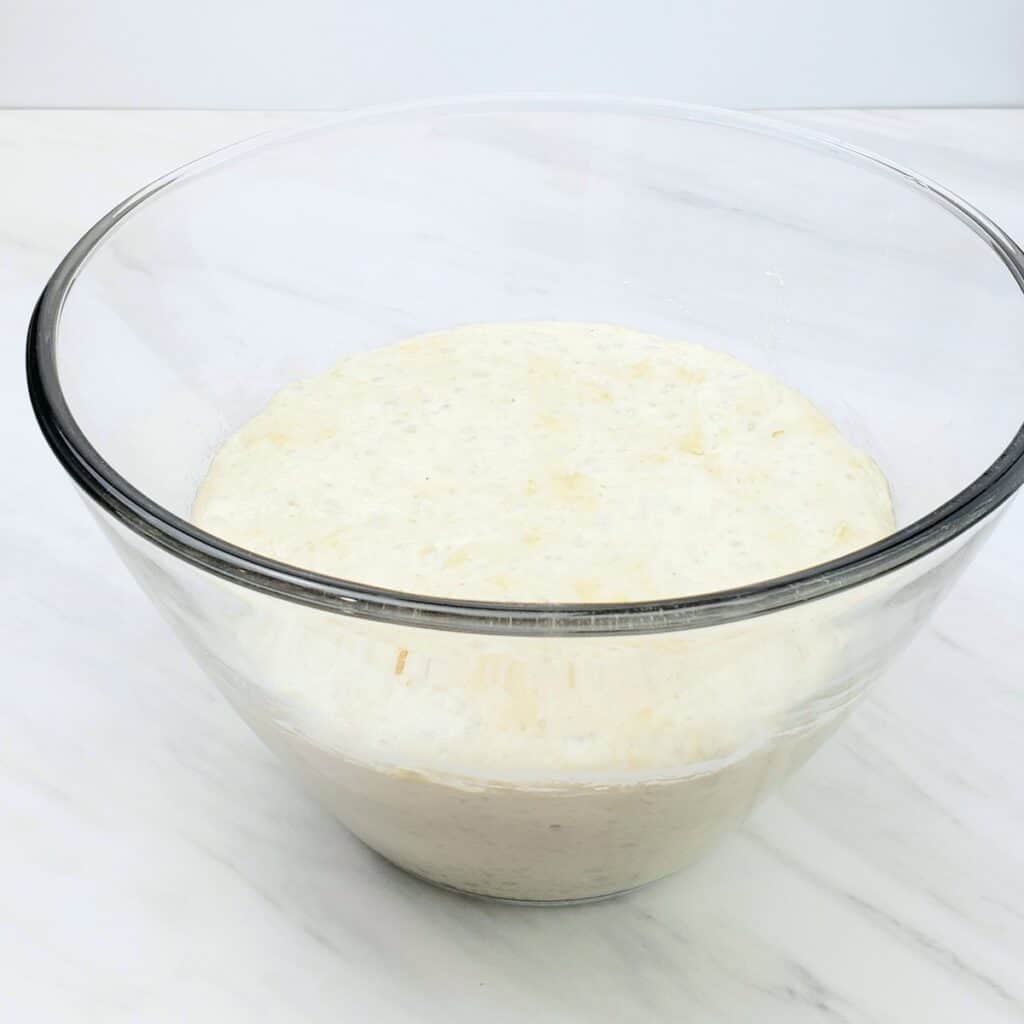
- Cover the bowl loosely with plastic wrap, then cover with a kitchen towel. Let rise at room temperature or in the refrigerator. See times in the printable recipe.
- Remove plastic wrap and towel. Dough will rise AT LEAST to double in size.

- Preheat oven with Dutch oven and lid on the middle rack to 450F.
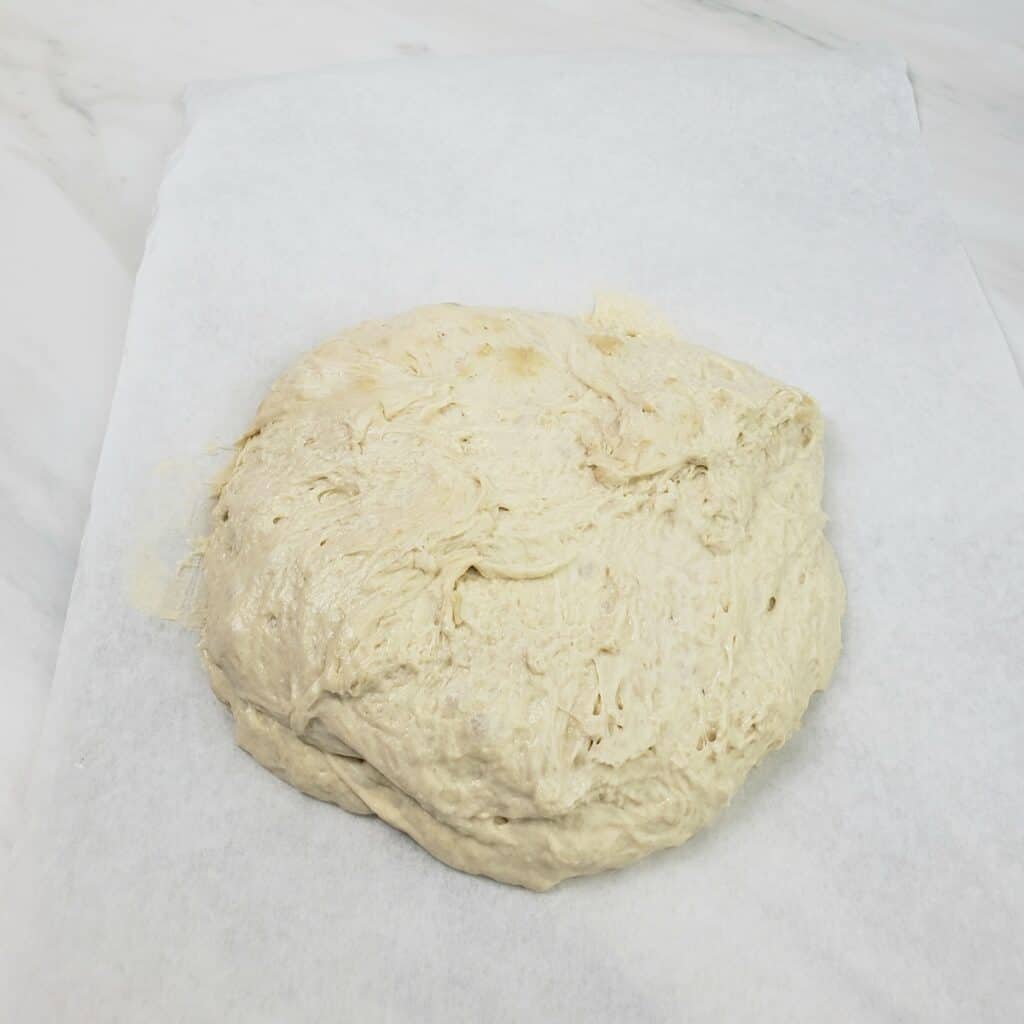
- With a spatula, slowly scrape the dough directly onto a sheet of parchment paper. You don't even have to touch the dough or sprinkle flour on the parchment. The less the dough is handled, the larger the air bubbles.
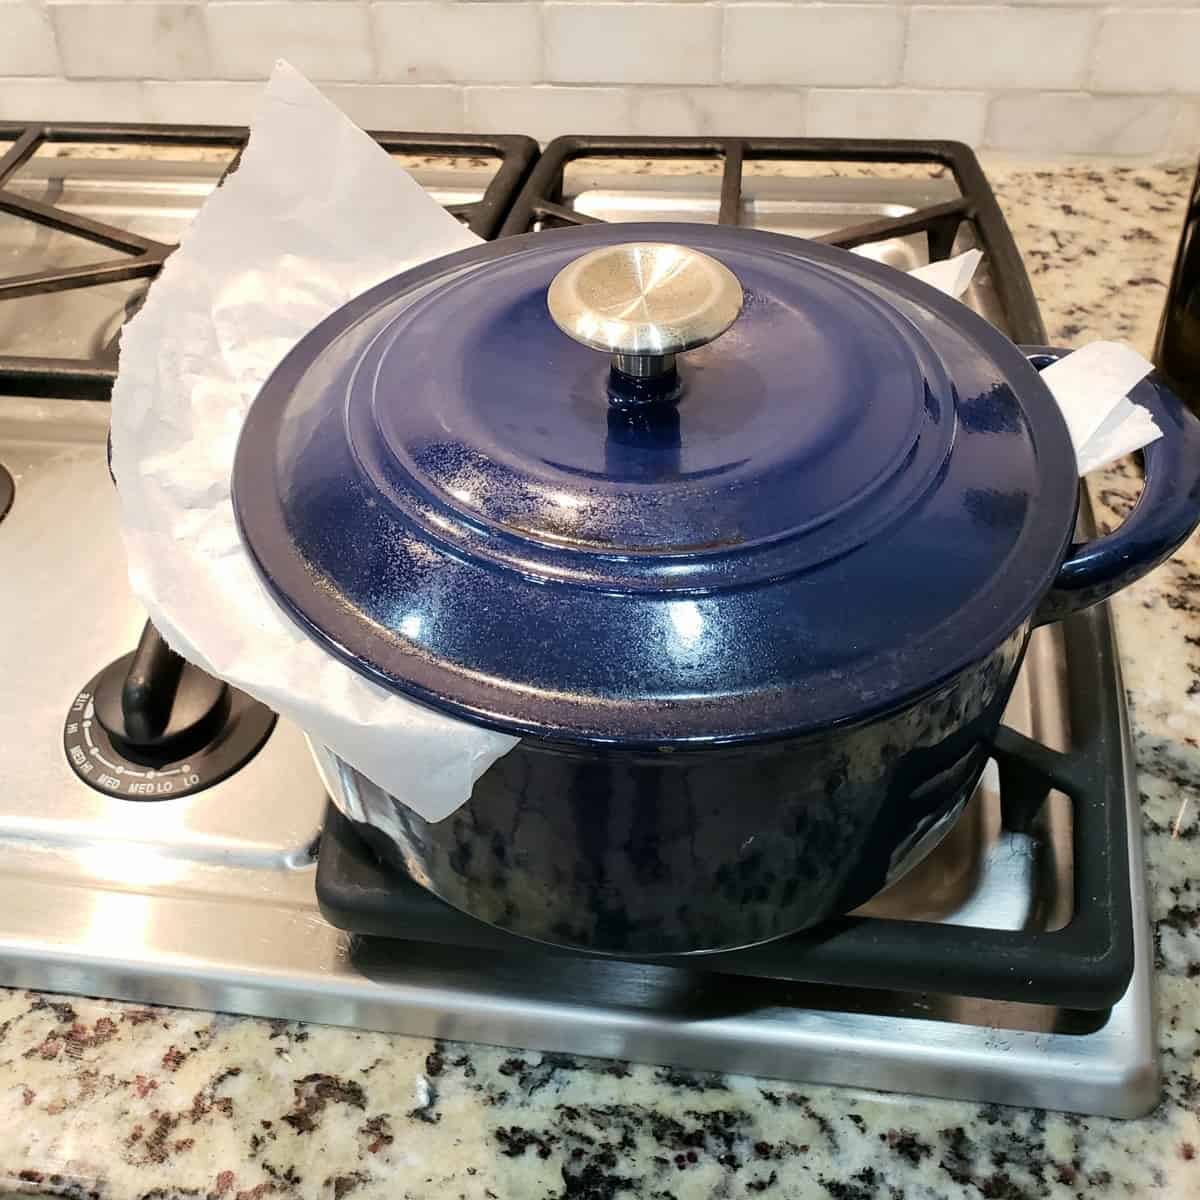
- With pot holders, remove the hot Dutch oven and place on the stovetop.
- Pick up the corners of the parchment and transfer the dough ball into the Dutch oven. With the spatula, push the parchment up against the sides of the pan.
Pro Tip
Parchment Paper: Normally, I love the parchment paper at the local dollar store. In this case, I don't recommend it because it sticks to the bread. Be sure to buy a good quality parchment paper and the bread will literally slide off the paper after baking.
A smaller piece of parchment paper can be used or you can trim it if you like. I left it the size straight out of the box to save a step and make it easy peasy.
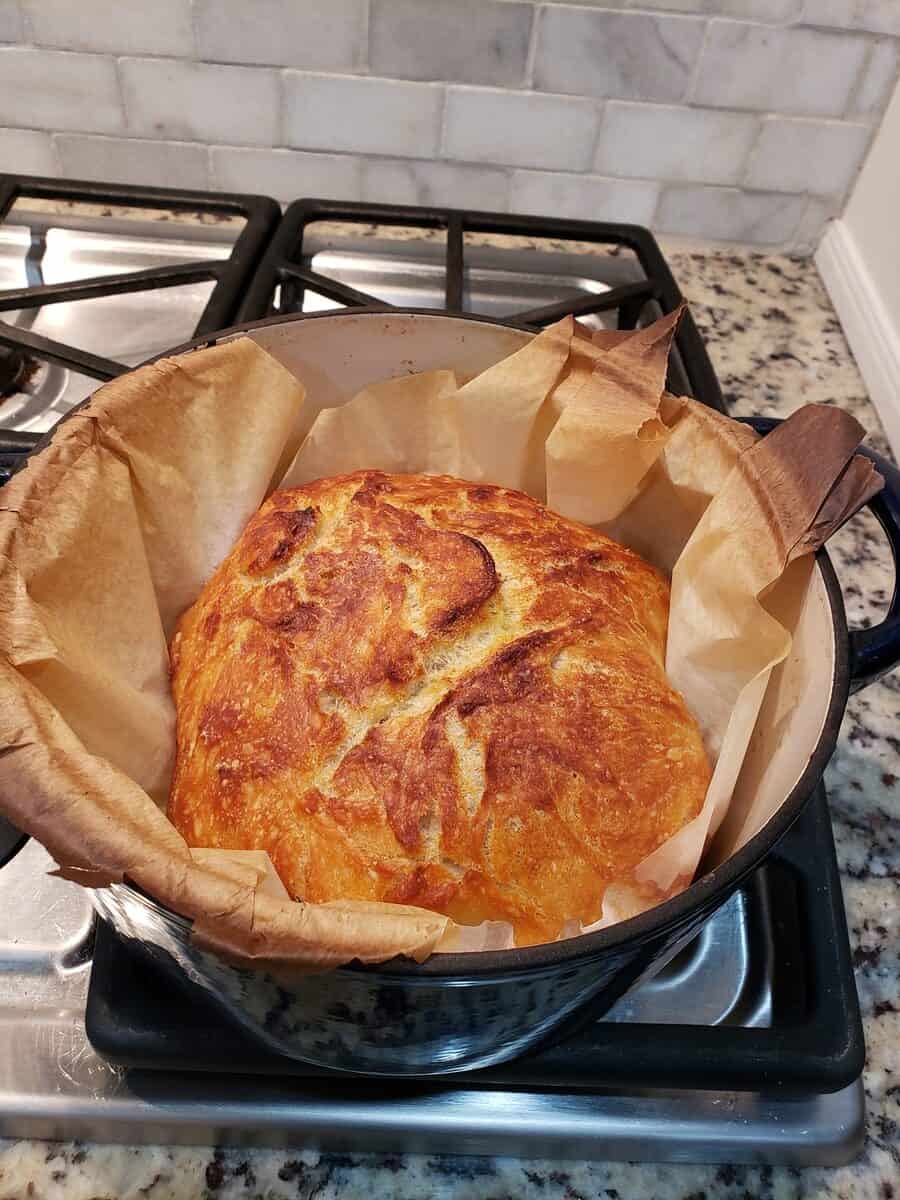
- With potholders, place the lid on the pot and carefully place on the middle rack in the oven. Bake at 450F for 30 minutes. Remove the lid and bake uncovered for 15 minutes.
Slice or break off a piece of No Knead Dutch Oven Artisan Bread and dip in extra virgin olive oil or flavored olive oil for a delicious appetizer or snack.
I could literally live on this combination for breakfast, lunch and dinner!
How can I serve Artisan Bread?
- My husband's favorite way to eat this crusty, chewy bread is to dip it into specialty olive oils such as Italian Herb or lemon-infused oil.
- My favorite way to eat it is served with a hearty stew like Shortcut Chicken and Sausage Gumbo so I can soak up the broth with a big wedge of the flavorful bread.
- Serve it warm, slathered with butter and jam. Try it with Easy Strawberry Freezer Jam, Peach Freezer Marmalade, or Slow Cooker Fig Jam.
How long can I let No Knead Bread Dough Rise?
- 2 to 3 hours in a proofing oven (85-90F)
- Up to 24 hours at room temperature.
- Up to 3 days in the refrigerator.
Active dry yeast vs rapid rise instant yeast
This is the crazy part of this amazing No Knead Dutch Oven Artisan Bread! You can use either active dry yeast or instant yeast! It just takes longer for the dough to rise and create the sought-after air bubbles when using active dry yeast.
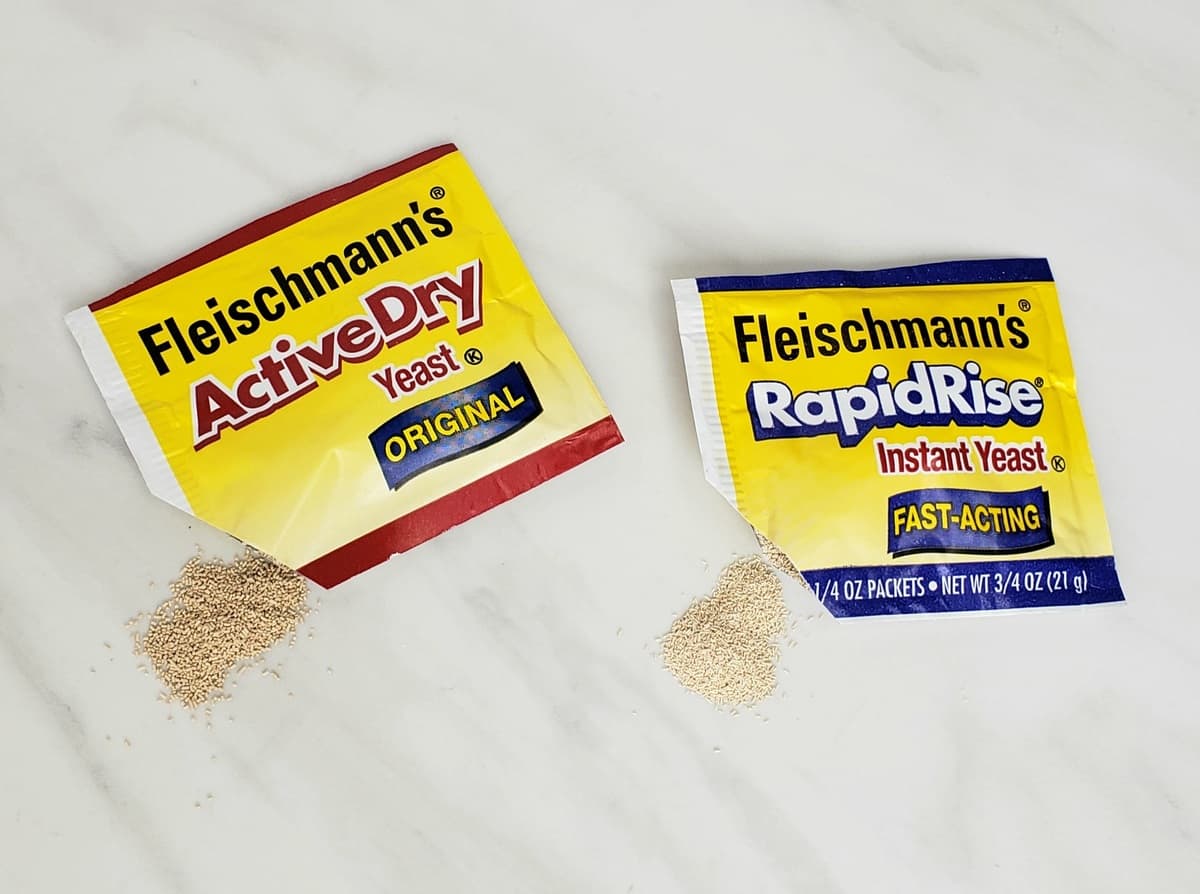
First, both active dry yeast and instant (RapidRise) yeast are dry forms of yeast. The main differences between the two dry yeasts is the size of the granules and stability. Instant yeast has much smaller granules and therefore can be activated just by the moisture in a dough.
Active dry yeast is less stable than instant yeast. According to an article from Serious Eats on All About Dry Yeast, due to the manufacturing process to make instant yeast, it is 100% shelf stable.
A 4 quart enamel-coated cast iron Dutch oven is what I have, so that's what I used. Dutch ovens vary greatly in size. I think a Dutch oven ranging in size from 2.5 to 5 quart would work for this amount of yeast bread dough.
I don't see why not! A much larger Dutch oven will be needed for that much dough, though. My 7 quart Dutch oven would probably work perfectly. I don't even think you would have to adjust the baking time. Just add a few minutes on the uncovered time if it isn't brown enough after 15 minutes.
Maybe. A cast iron Dutch oven can withstand the intense heat of up to 500F and creates the moist atmosphere inside the pan which gives this no knead artisan bread it's distinctive texture and crunchy crust. A regular pot with a lid might be too thin and therefore burn the outside edges and bottom of the bread.
If you have a very heavy-duty pot or pan with a heavy lid about a 4 quart capacity, then that pot might work. Chances are, it's actually a Dutch oven and called by another name. Leave a comment below if you make it this way and let us know how it turns out! A deep sided cast iron skillet with a domed lid may be the best alternative.
Where can I buy a cast iron Dutch Oven?
- TJ Maxx, Marshalls, and Home Goods all have excellent prices on enamel-coated Dutch ovens.
- Walmart, Sams Wholesale, and Costco carry their own brands plus Lodge brand.
- Amazon carries many sizes and brands of 4.5 quart Dutch ovens.
Follow me on Facebook, Instagram, Pinterest and YouTube. Be social and share, y'all! Want all my new recipes and updates? Get my weekly newsletter in your inbox!
Leave a comment below the printable recipe if you have questions or want to tell me how you liked the recipe. Don't forget to give the recipe a rating of 5 stars if you love it!
Other shortcut breads you will love
- No Knead Dinner Rolls (Spoon Rolls)
- 2 Ingredient Biscuits From Scratch
- Best Ever One Bowl Banana Bread
- Double Stuffed Cinnamon Rolls
- Vidalia Onion Cornbread with Caramelized Onion Fans

Dutch Oven No Knead Bread
SAVE THIS RECIPE
Equipment
Ingredients
- 3 cups all-purpose flour (or Bread flour)
- 1 ½ teaspoons salt (or 1 ¾ teaspoons Kosher salt)
- ½ teaspoon active dry or instant yeast
- 1 ½ cups tap water (somewhere between cold and hot-lukewarm)
Instructions
- Combine flour, salt and yeast in a large bowl.
- Add water and stir until all the flour is moistened. It will form a loose ball. No "need" (see what I did there-ha) to stir vigorously or for a long time.
- Cover the bowl loosely with plastic wrap, then cover with a kitchen towel. Towel doesn't have to be damp unless you're skipping the plastic wrap. Let rise at room temperature for 12 to 24 hours if using active dry yeast. Let rise for 8 to 24 hours if using instant (RapidRise) yeast.Honestly, if you bake it a few hours earlier than these minimum suggested hours, as long as the dough has doubled in size, it will still be yummy, there just won't be as many large air bubbles. Large air bubbles help create the tantalizing texture you see in my pictures.See Note below for refrigerator rising times.
- Preheat oven with Dutch oven and lid on the middle rack to 450F.
- Remove plastic wrap and towel. Dough will rise AT LEAST to double in size.
- With a silicone or rubber spatula, slowly scrape the dough directly onto a square sheet of parchment paper. You don't even have to touch the dough or sprinkle flour on the parchment. The less the dough is handled, the larger the air bubbles-which is what you want.
- With pot holders, carefully remove the hot Dutch oven and place on the stovetop or my favorite heat-resistant silicone trivet. The pot and lid are HOT! Pick up the corners of the parchment and transfer the dough ball into the Dutch oven. With the spatula, push the parchment up against the sides of the pan away from the dough.Parchment: A smaller piece of parchment paper can be used than I used in the pictures or you can trim it if you like. I left it the size straight out of the box to save a step and make it easy peasy.
- With potholders, place the lid on the pot and carefully place back on the middle rack in the oven. Bake at 450F for 30 minutes. Carefully remove the lid and bake uncovered for 15 minutes.
- (Optional) I love to drizzle about 2 teaspoons of high quality olive oil and brush it over the top of the bread before baking it the additional 15 minutes. My favorite is Tuscan Herb flavored olive oil. The flavor it infuses in that short amount of time is fantastic. It also gives it a deeper golden brown crust.
Notes
Nutrition
Nutrition analysis on GritsAndGouda.com recipes are mostly calculated on an online nutrition calculator. I am not a dietitian and nutritional information is an estimate and can vary based on products used.
Susan Thompson
I have a aluminum loaded pan would that be ok.
Kathleen
Hi Susan! Could you be more specific as to what you mean by "aluminum loaded pan? If it's an aluminum disposable pan, that won't be heavy enough. Do you have a cast iron skillet? That might work if you cover it with tented heavy duty foil.
Mike Kalinoski
Just getting mine out of the oven and I'm disappointed. Looks flat. I know my yeast is good because of last week's bread recipe and it's a new jar of yeast. It had a ton of air in it when I put it on the parchment and that yeasty smell was awesome. Not sure what happened. Wish I could post photos.
Kathleen
Oh goodness! Let me see if I can help troubleshoot with you. It sounds like it was working well until maybe it went into the oven. How long did it rise before putting it on the parchment. Sometimes if it rises too much, it will deflate but I don't think that was it. Another reason bread will deflate is lack of structure, like not enough flour. When measuring your flour, did you spoon flour into a dry measuring cup and level off with a knife? The last possibility I can think of is if your cast iron dutch oven wasn't heated long enough? I do hope these suggestions are helpful and that you will try it again. Dozens of folks have made it and rave about it. Do try it again!
Eric
I think the Flour to Water to Yeast ratio is off. Mine never rose and I followed the directions to the specific measurements. I actually used rapid rise yeast and let it sit for 20 hours and I know for a fact it did not deflate because it never came close to doubling in size. I suspect 1.5 C of water is too much for only 3 cups of Flour and I also suspect you need more than 1 tsp of yeast.
gritsandgouda
I'm so glad you reached out with your comment about your bread not rising. I highly recommend trying it again doing exactly what you did but with a new package of yeast, not from the same batch as the first. Yeast is a living thing and it can actually die and become unusable. Even if the expiration date is still good, it may have been exposed to heat or other factors that will make it inactive. A good way to test your yeast is to add 1/2 teaspoon of granulated sugar in a small amount of water. If the yeast bubbles up (it's feeding on the sugar), the yeast is active. I hope you try it again as many readers have made this recipe over and over and super happy with results. Let me know how it turns out! I want you to be successful!
Grace
I accidentally used the whole packet of yeast instead of one teaspoon and it was perfect!
Kathleen
Oh that's good to know it works well with the whole package! Thank you for sharing that!
Jen
Can you mix herbs into the dough?
gritsandgouda
Absolutely! You can stir them into the flour before adding water so they are evenly distributed. You wouldn't want to add them after the dough has risen because you don't want to stir the dough at all. Stirring the dough removes air bubbles that gives you those glorious large air pockets in the bread. 1 teaspoon of dried rosemary, dillweed, basil or Italian herbs is a good amount or 2 to 3 teaspoons chopped fresh herbs. You can also add dried cranberries, raisins, and olives!
Ruth
I don’t have a cast iron Dutch oven. What else can I use ?
gritsandgouda
It's the cast iron Dutch oven itself that creates the moist environment inside the heavy pot with tight lid. Plus, the high heat creates the crunchy, thick crust on the outside without burning the bottom of the bread.
Maybe a very heavy-duty stainless steel pot with a heavy bottom and oven proof lid could be tried. You might bake a little longer before removing the lid and definitely brush with the optional olive oil as mentioned to get as golden brown a crust as possible without thecast iron Dutch oven.
I'd love to know if this works for you if you try it!
Linda
This is wonderful bread, but I had to stop , I have a le cruset Dutch oven, you can’t get much better than this, and the high heat started to take the enamel off my pan. Not going to ruin my pan 🙃
gritsandgouda
That's interesting and unfortunate. 🙁 I looked it up and Le Creuset, like other brands I checked, are oven safe up to 500F. I wonder if you could get a replacement pot since yours is chipping?
David
I could eat this bread every day for every meal!
gritsandgouda
Me too!
Jen
Mine came out flat. I’m not sure what I did wrong. It still tastes good though
gritsandgouda
Awww...I know that is upsetting. My two suggestions to prevent the bread from being flat is be sure to gently scrape the dough onto the parchment paper in about 3 or 4 scrapes with a silicone/rubber spatula so you are preserving those big air bubbles and not deflating the dough. The second tip would be possibly let the dough rise a little less if your room is above 72 degrees temperature. If dough over rises, it will deflate and not recover in the oven. I hope this helps and that you will try it again!
Presley
Best bread I’ve ever tasted. Turned out beautiful!